At one of the customers sites we are using JIRA OnDemand (A.K.A JIRA Cloud now) to track our BSM tasks and cost estimates, which we provide for a planned piece of work and these exist in JIRA as Excel files attached to tasks.
As the end of financial year is coming close here in Australia I was asked by my manger to send him these cost estimates for the last financial year. Trying to do it manually one by one from the Web UI for a couple of them made me think that there must be a better way to accomplish that. Google search did bring a few results but they were relevant to on premisses hosted JIRA solution where you had access to the command line. These didn’t suit me. So after playing around a little I came up with the solution described below. If you have a Linux machine (and a know how) you could probably achieve that in a couple of lines but I only had access to my Windows machine at that time . In addition to a Windows machine you will need Notepad++.
Export JIRA backup
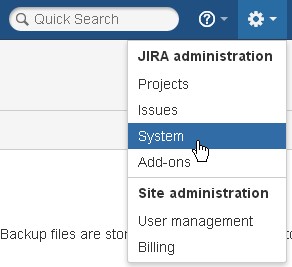
- In the JIRA OnDemand interface navigate to JIRA Administration > System
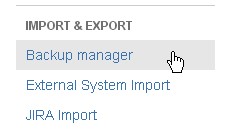
- Under the Import and Export click Backup manager
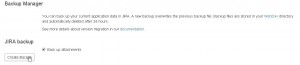
- On the Backup manager page verify that Back up attachments is checked and click Create Backup
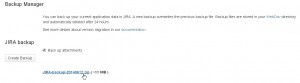
- Once the backup is done a link to download the backup archive will be visible.
- Download the file and unzip it to a temporary folder (I’ve used C:\Temp).

Extracting attachments’ file names
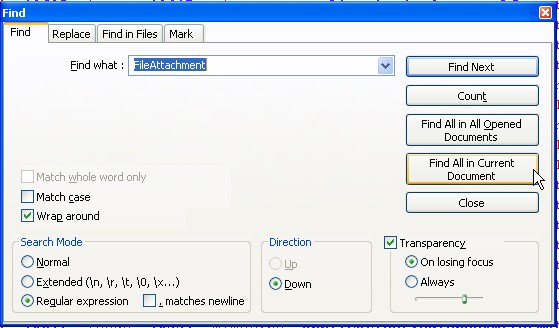
- Open the C:\Temp\JIRA-backup-20140605\entities.xml with Notepad++
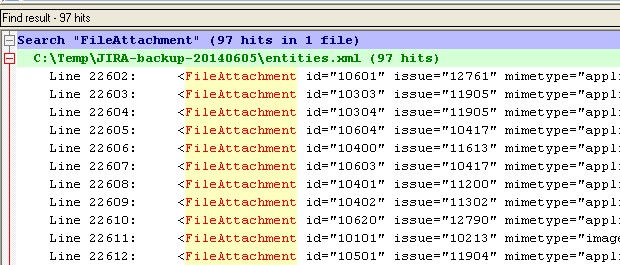
- Search the file for all the lines that have following text: FileAttachment
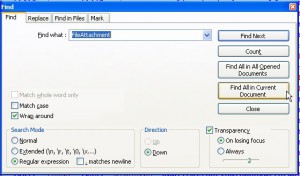
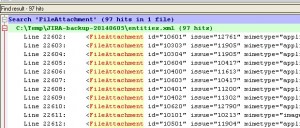
- The result will be shown in the “Find result” pane
- Open a new file in Notepad++ and copy all the content from “Find result” pane
- Run the following replace:
.+id=”(\d+)”.+filename=(“.+?”).+
ren \1 \2 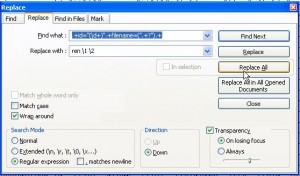
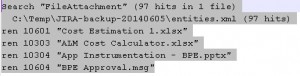
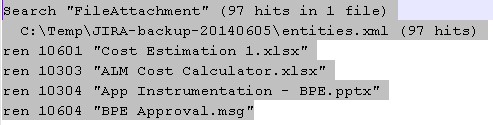
- As a result you will have somthing simmilar to the below:
- Remove all the lines that don’t start with “ren”

Copy files from all subfolders to a single folder
- The attachments are located in the <BACKUP_ARCHIVE_FILE>\data\attachments folder (in our case it’s C:\temp\JIRA-backup-20140605\data\attachments)
- Open a command prompt:
- Change current directory to the attachments one
cd C:\temp\JIRA-backup-20140605\data\attachments
Note: if you are interested only in attachments from a specific project then type cd C:\temp\JIRA-backup-20140605\data\attachments\<PROJECT_NAME> instead of the above. - Create an output folder (if you are interested only in attachments from a specific project
md c:\temp\JIraAttachments\ - Copy files form all the projects into the output folder
for /R %b in (.) do @copy %b\*.* c:\temp\JIraAttachments\ - Change the current directory to the output directory
cd c:\Temp\JIraAttchments - Rename the files (just copy and paste the content of the text file from Notepad++
ren 10601 “Cost Estimation 1.xlsx”
ren 10303 “ALM Cost Calculator.xlsx”
ren 10304 “App Instrumentation – BPE.pptx”
ren 10604 “BPE Approval.msg”
…………. - The result is that you have all the attachments in one folder. By the way the attributes (like Date Modified) are kept

Hi there,
With JExcel PRO you can export comments images and other attachments with the issues from JIRA to Excel or HTML.
You can find it on the Atlassian Marketplace: https://marketplace.atlassian.com/plugins/com.moresimp.jexcel.pro/server/overview
If you want to use it on the Cloud, check out our Cloud solution: http://moresimp.com/hosting
(In some parts, it is better than the Atlassian Cloud.)
Try it and let me know how you like it! 🙂
Thank you.
Mark
HI Mark,
There are a few way/plugins to achieve the export on self-hosted aka Server Jira instances and your looks nice on the marketplace (haven’t tried it).
Saying that, my issue was that we had a Cloud (Atlassian) hosted Jira instance….
Regards,
ILYA
Thank You Ilya, this was very helpful.
I modified this a bit in order to keep each attachment in the folder of each Jira item.
Thanks,
Christina
Glad it helped Christina
How did you modify this so that each attachment are in their respective Jira id folders
How were you able to modify the filename so that it gets renamed and stays within its own folder?
Hi Chintak,
I don’t think that the files stayed within their folders.
As you can see in “Copy files from all subfolders to a single folder” step we are actually moving them to a single output folder.
Do you require them to stay within their own folder?
Regards,
ILYA
hi, how did you do that?
Hi Ilya,
Thank you very much for this
I’m hoping you can help me.
When I get to this step
Run the following replace:
.+id=”(\d+)”.+filename=(“.+?”).+
ren \1 \2
I get an error “Can’t find text .+id=”(\d+)”.+filename=(“.+?”).+, is there a solution for this please?
Many thanks
Hi Ade,
Have you selected the “regular expression” option on the notepad++ search and replace window?
Regards,
Ilya
Hi Ilya,
i have the same problem. Regular rexpression is selected. Any ideas?
And thank you much for this artivle, it will safe hours of my time.
Regards,
Basti
Hi Basti,
Try to paste here the actual lines that you have, maybe the format has changed from 5 years ago when I wrote this post.
Regards,
ILYA
Hi IIya ,
as you said above i have struck at the same line that is
.+id=”(\d+)”.+filename=(“.+?”).+
ren \1 \2
its showing the error like ,
“0” Occurances, were replaced , this is not replacing the values
Hi Sai,
Try to paste here the actual lines that you have, maybe the format has changed from 5 years ago when I wrote this post.
Regards,
ILYA
Hi,
I am facing same issue for Find and Replace.
Line is :
Line 1947698:
Can you please help?
Here are some lines:
Line 1947683:
Line 1947684:
Line 1947685:
Is there any content after the line numbers? as I can’t see anything in the comment?
I noticed that you use “ brackets, and my file had “. I changed that and it worked just fine. Maybe other people had same issue.
yeah this worked for me by using ” (straight quote character) instead of ” (curved quote character).
Read https://docs.oracle.com/javase/tutorial/essential/regex/groups.html to understand the capture groups and backreferences used in the regex equation in this article
For anyone looking at how this article who wants to keep all the attachments in the right folder for the ticket they’re associated with, check out the below batch script I wrote. You can use this instead of the commands in the “Copy files from all subfolders to a single folder” part of this article. Make sure you switch out the tokens accordingly.
—
@echo off
REM ^turn off echo so that only the output is written to the prompt, makes this a cleaner experience
REM run this by typing ‘{BATCH_FILE_withFullFilepath} > log.txt 2>&1’ into command line, which saves console output to the ‘log.txt’ file
REM this code is based on https://isbyr.com/how-to-export-attachments-from-jira-ondemand, but has been modified to keep attachments in their ticket’s sub-folder:
REM 1. Follow instructions to “Create backup for server” from a Jira Cloud instance, see https://support.atlassian.com/jira-cloud-administration/docs/export-issues/
REM 2. Extract the jira-export.zip file
REM 3. Follow steps in the article for “Extracting attachments’ file names”… use the same account that’ll run this script to avoid permission issues
REM this code will iterate through all the folders and change the file names from their unmarked file type and numeric filename to the correct name and file type.
REM this code assumes the following file structure which is standard for the Atlassian Jira Cloud backup for server zip file
REM ├──|attachments\
REM ├──{JIRAPROJECTKEY}\
REM ├──{10000_Grouping}
REM ├──{JIRA-TICKET-ID}
REM ├──{JIRA-TICKET-ID}
REM └──{JIRA-TICKET-ID}
REM └──{20000_Grouping}
REM ├──{JIRA-TICKET-ID}
REM ├──{JIRA-TICKET-ID}
REM └──{JIRA-TICKET-ID}
REM └──{JIRAPROJECTKEY}\
REM set the file paths you’ll need for everything
set mainDirectory={top-level-folder-with-extracted-zip-file}
set filesToRename={attachments-folder-inside-extracted-zip}
set renameCmdList={FilePath-of-text-file-with-ren-commands}
REM run this command to ensure the script starts in the right directory
cd /D %mainDirectory%
REM first, we’ll recurrsively loop through the folder and look for files
for /R %filesToRename% %%G in (*) do (
REM for every found file, search through the renameCmdList.txt file for the matching row…
REM the spaces in the search string ensure you get an exact match… e.g. to avoid 1001 matching with 10011…
REM then the output of the find (the matching row’s rename command) is pulled out and ran
REM the skip=2 skips the first line returned by the find which is just a header row with the folder path
REM the delims=” changes the delimiter from a space to a newline, since we want the whole line captured in one variable
REM if the file name is in the txt file, then this code will run
for /f “skip=2 delims=” %%Q in (‘find ” %%~nG ” %renameCmdList%’) do (
REM you need to cd into the right folder of the file b/c the commands in the txt file don’t have the full path
REM the ~p inside the %%G variable returns just the file’s path… the ~n returns just the file’s name
cd %%~pG
REM echo for troubleshooting
echo current Dir. path is: %CD%
echo matched file path is: %%~pG
echo matched file name is: %%~nG
echo Found row and ran command: %%Q
REM the find returns the full line the match was found on, which is itself a command, e.g. ‘ren 10532 “image001.jpg”‘
%%Q
)
REM add a blank line to keep the console/log legible
echo.
REM you can uncomment this pause for debugging
REM pause
)
REM move back to the mainDirectory where we started, just to keep it clean
cd %mainDirectory%
Thanks for that enhancement Grayson
When I used the updated script from Grayson it would work for a folder, but when it switched directories it started saying “The syntax of the command is incorrect”
current Dir. path is: C:\Jira
matched file path is: \Jira\Files\CMP\10000\CMP-1065\
matched file name is: 29764
Found row and ran command: ren 29764 “ScreenShot.jpg”
.
current Dir. path is: C:\Jira
matched file path is: \\Jira\Files\CMP\10000\CMP-1065\
matched file name is: 29765
Found row and ran command: ren 29765 “ScreenShot_2.jpg”
.
current Dir. path is: C:\Jira
matched file path is: \Jira\Files\CMP\10000\CMP-1068\
matched file name is: 29718
Found row and ran command: ren 29718 “ScreenShot_3.jpg”
The syntax of the command is incorrect.
If I stopped it the cmd prompt was in the correct directory and if I ran it again it would work for the next folder, I messed with it for awhile but could not get it to work. I gave up and converted it to a PowerShell script. I am sure there is a better way to do it, but the below worked for me.
$mainDirectory = “C:\Jira”
$filesToRename = “C:\Jira\Files”
$renameCmdList = “C:\Jira\NewnamesPS.txt”
# Get the file with all of the rename commands
$commands = Get-Content -Path $renameCmdList
# Cycle through each line of the file
foreach ($command in $commands) {
# Find the generic filename from the line by extracting the data after the .\
$filename = [regex]::Match($command, “\d+”).Value
# Display the filename
Write-Host “Filename:” $filename
# Search for the file in the filesToRename directory
$file = Get-Childitem -Path $filesToRename -Recurse | Where-Object { $_.Name -eq $filename }
# If the file is found, set the found directory as current and execute the line from the renameCmdList file
if ($file) {
Set-Location (Split-Path -Path $file.Fullname -Parent)
Write-Host “Current Path” $PWD.Path
Write-Host “Final:” $command
Invoke-Expression $command
# If the file is not found, report to console
} else {
Write-Host “Not Found”
}
}
The renameCmdList names file needs to be setup with the Powershell commands instead of the CMD ones like so:
Rename-Item -Path .\72633 -NewName “screenshot-1.png”
Appreciate sharing of the PowerShell script to the solution that allows to export attachments from Jira